Files Than Can Be Uploaded to Gainsight
File Analyzer Admin Guide
Overview
Admins can employ the File Analyzer to scan any CSV/TSV file to identify the root crusade of any upload issues the file might have. After uploading a file to Gainsight, yous can employ this feature to appraise any records that might have failed the upload. Y'all tin too use this characteristic to proactively place these bug and resolve them before ingesting the information into Gainsight.
To access the File Analyzer, navigate to Administration > Analyzer > File Analyzer
The File Analyzer has the following subtabs:
- Scan (Beta): Hither you tin can upload CSV/TSV files to browse them.
- Scan History: Displays a list of each browse completed by the File Analyzer.
Limitations:
- Merely CSV/TSV file formats are supported.
- The File Analyzer supports uploaded files that are less than 10 MB and S3 files that are less than 100 MB.
- Uploaded files should contain headers.
- Compressed and Encrypted files are not supported.
- Files uploaded to the analyzer, and any generated error files will be stored in your S3 saucepan for xxx days and will exist deleted afterward this fourth dimension.
Scan (Beta)
Under the Scan tab, admins tin can upload CSV/TSV files to scan them for potential upload problems. Take the following steps to complete a file scan:
- Select the type of data you want to analyze. The dataset you lot select will determine how File Analyzer validates the information. For the purposes of this tutorial, nosotros'll be selecting the Visitor dataset. You tin select the following types of datasets for analysis
- User: When you select this dataset selection, the File Analyzer will validate the data y'all upload against the Gainsight Standard User object.
- Company: When y'all select this dataset option, the File Analyzer will validate the data y'all upload confronting the Gainsight Standard Company object.
- People: When you lot select this dataset option, the File Analyzer will validate the data you upload against the Gainsight Standard Person object
- Relationship: When you select this dataset selection, the File Analyzer will validate the data y'all upload against the Gainsight Standard Relationship object.
- Custom Object: When you select this dataset option, the File Analyzer will validate the data you upload against an existing MDA custom object that you select.
- Generic File: When you select this dataset option, the File Analyzer will validate the data you upload irrespective of data type.
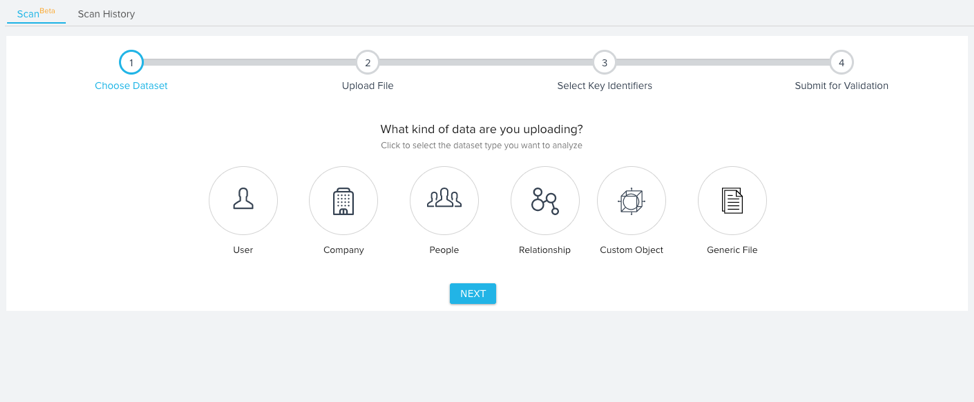
- Click Next.
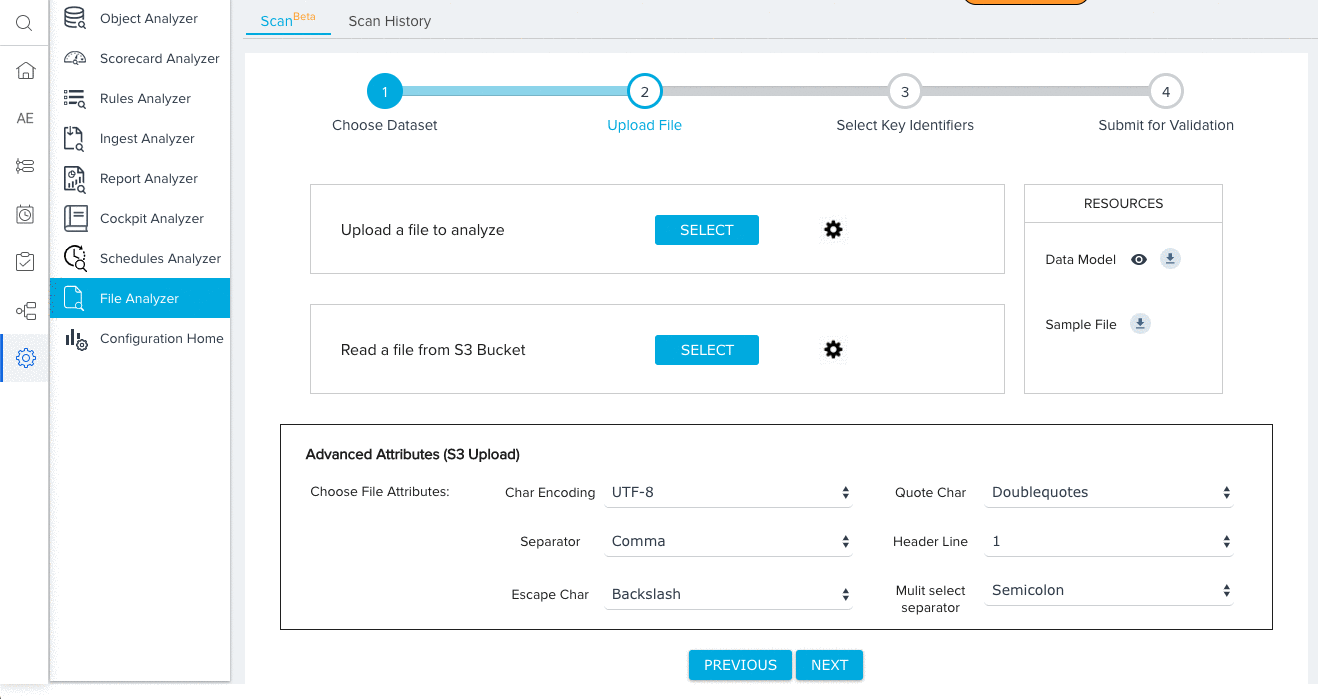
- Upload your file for assay either directly from your local automobile, or from an S3 Bucket. Apply the post-obit tools to configure your file upload method:
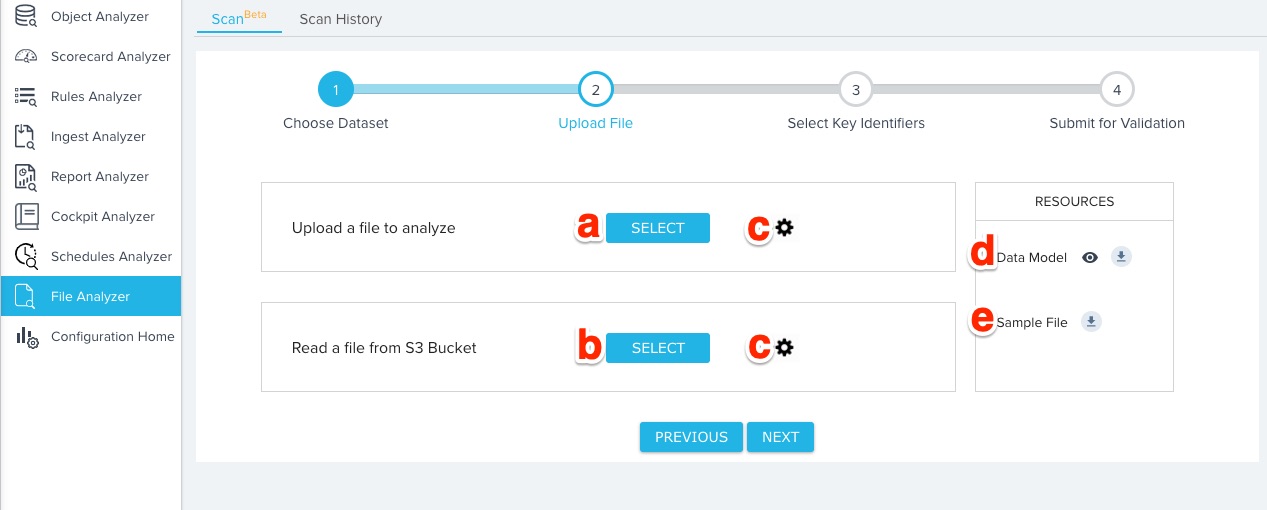
- Click SELECT to upload a file directly from your local automobile.
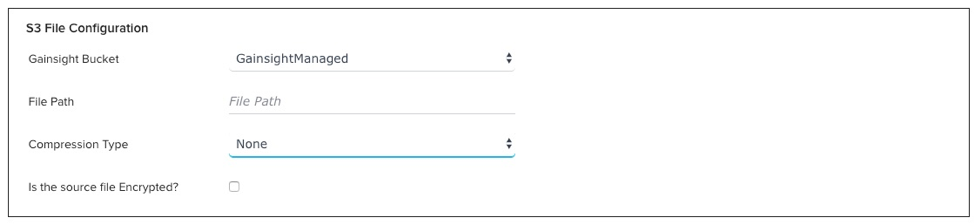
- Click SELECT to read a file from an S3 Bucket. Selecting this pick displays the S3 File Configuration section which you must fill out before proceeding. For more data on S3 File Configuration, refer to Gainsight S3 Connector under Additional Resource.
- Click to configure the following Advanced Attributes for either upload selection:
- Character Encoding
- Separator
- Escape Character
- Quote Grapheme
- Header Line
- Multi select separator
- Click the Eye icon to preview the Data Model yous selected. Click the Download icon to download the preview as a CSV.
Notation: This option is not available for the Custom Object and Generic File datasets.
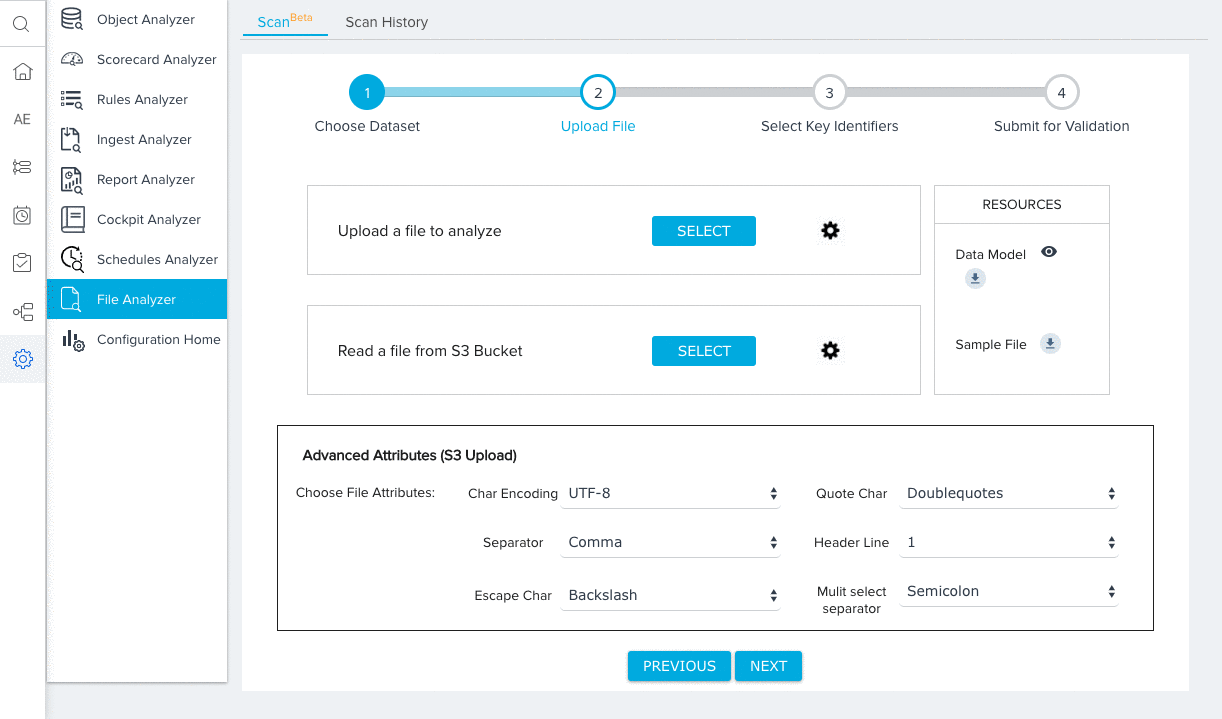
- Click the Download icon to download a sample file for the selected Data Model as a CSV.
Note: This selection is not bachelor for the Custom Object and Generic File datasets.
- Click Next
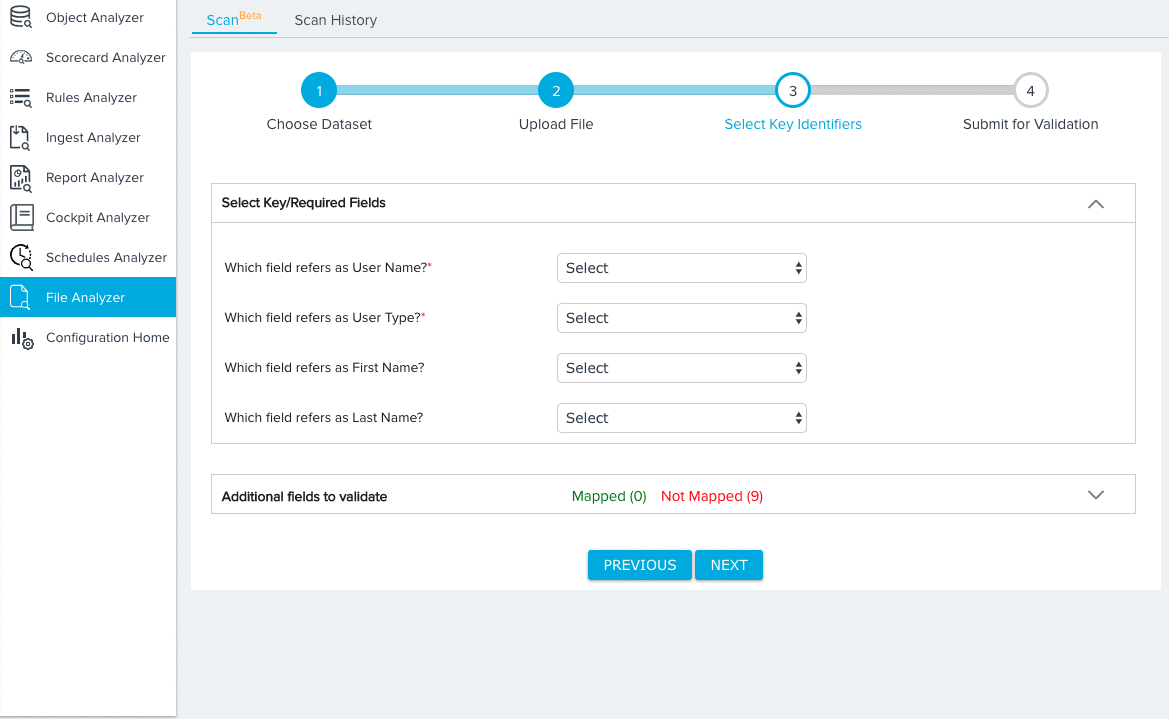
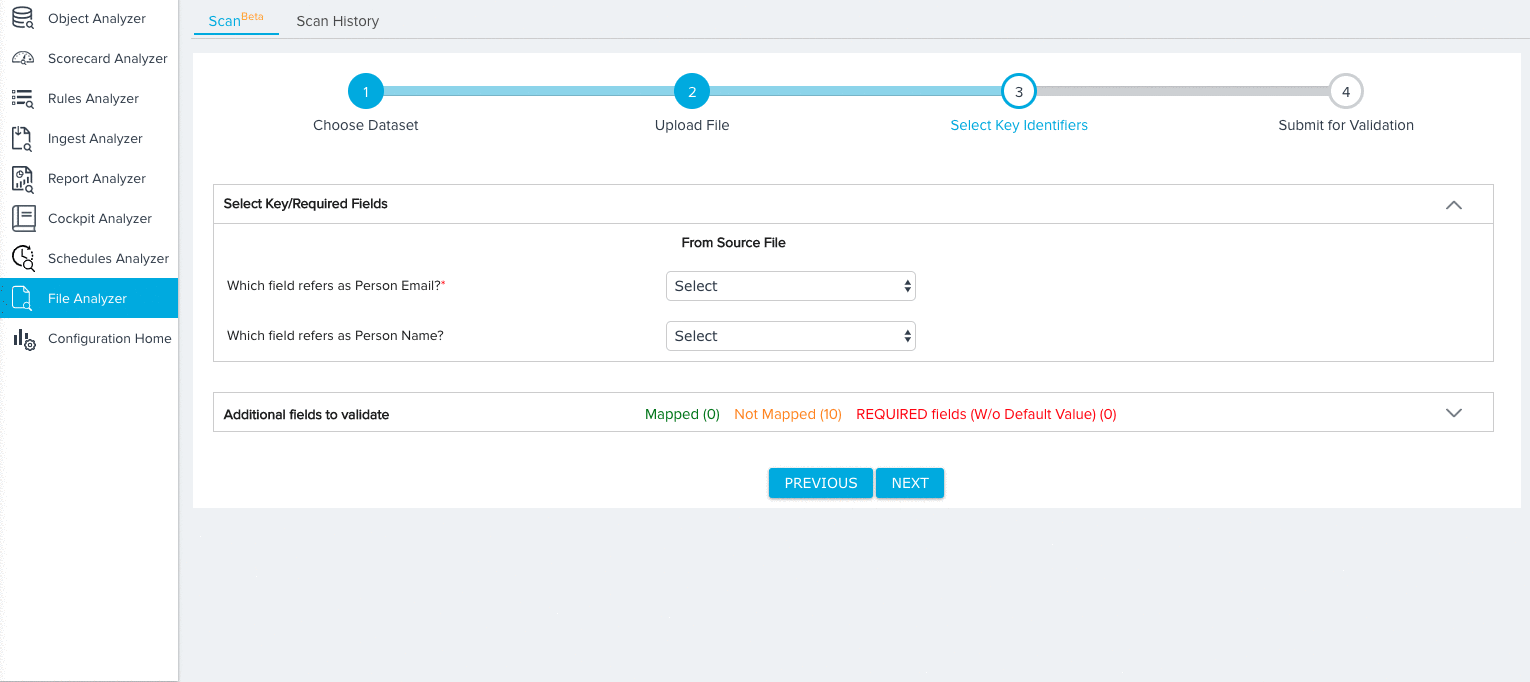
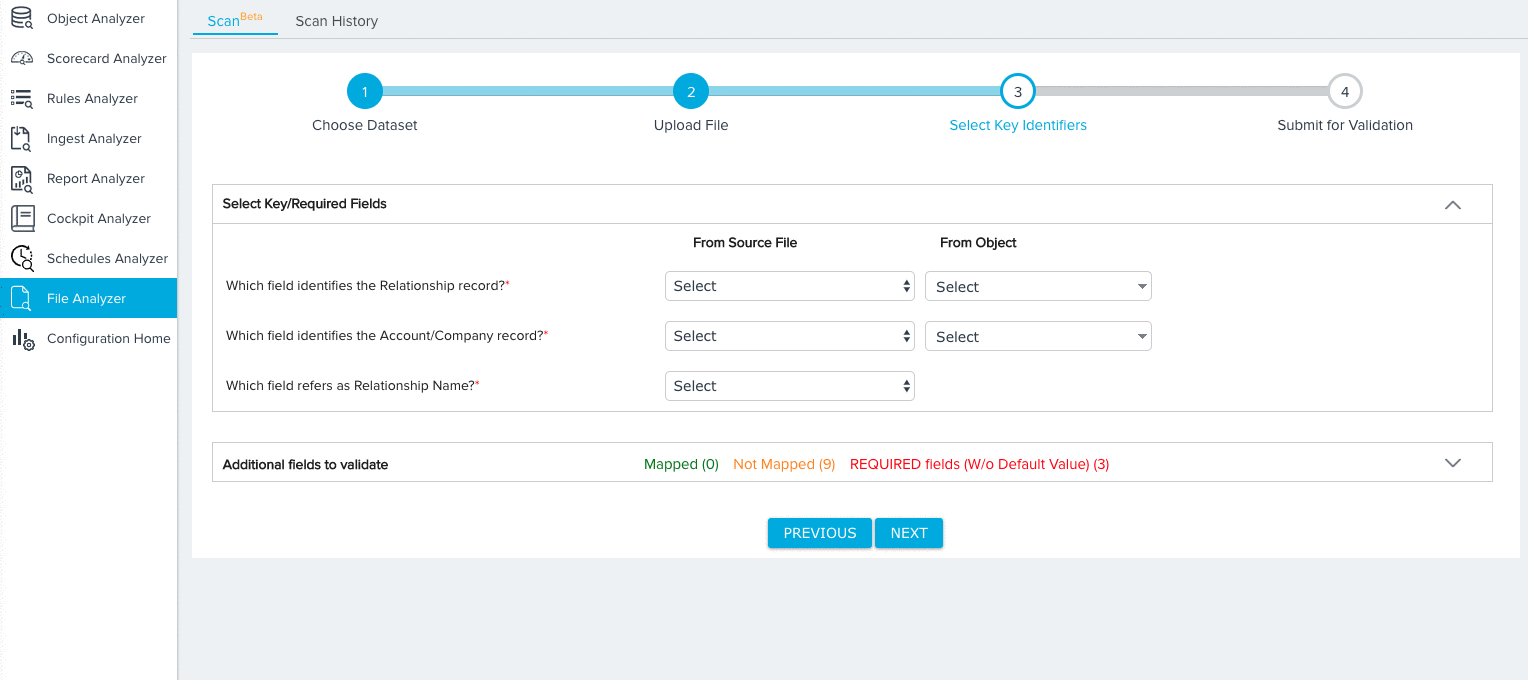
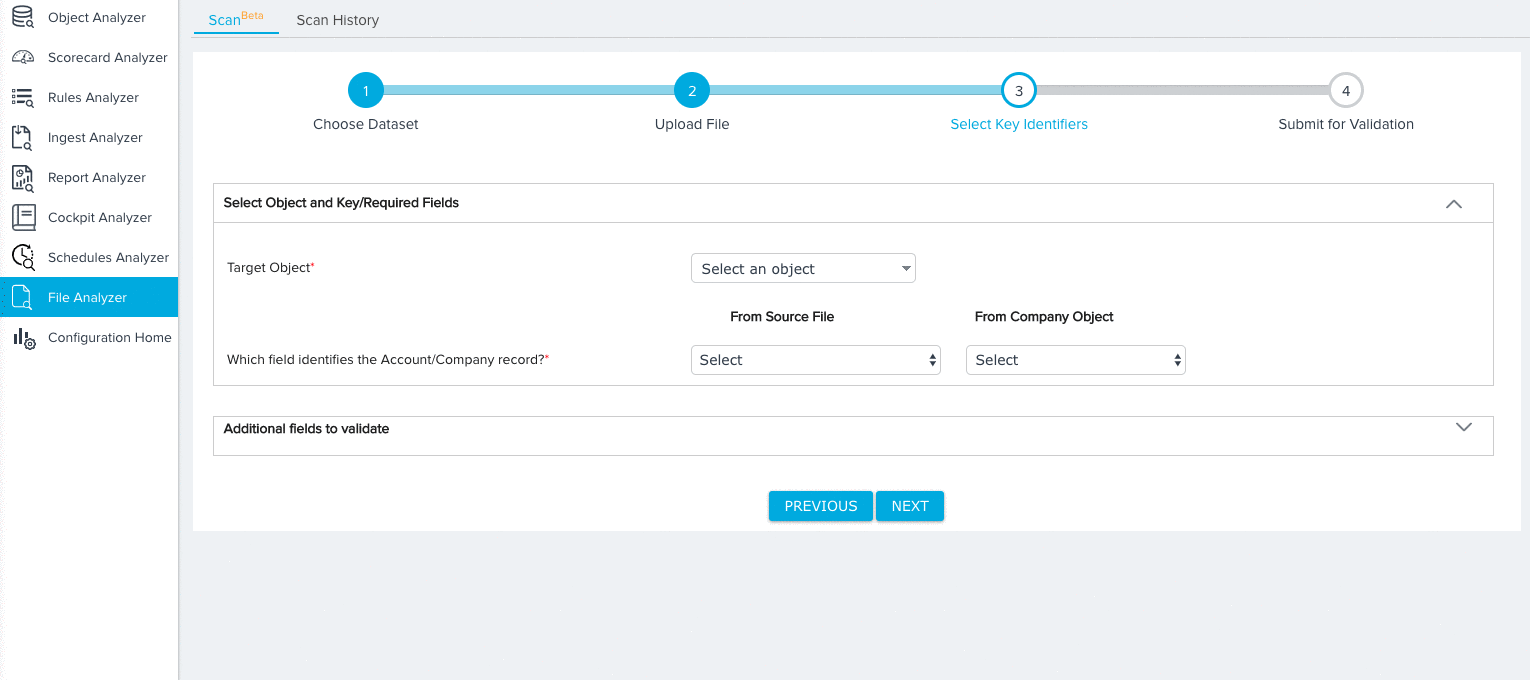
- Map cardinal identifiers/required fields based on the dataset you selected. For more information on the specific mappings required for each dataset, refer to Dataset Key Identifiers. For our tutorial, we'll need to make the following selections for the Company Information Model:
- A field from both the Source File and Company Object to identify each Visitor record.
- A field from the Source File to identify the proper noun of each visitor record.
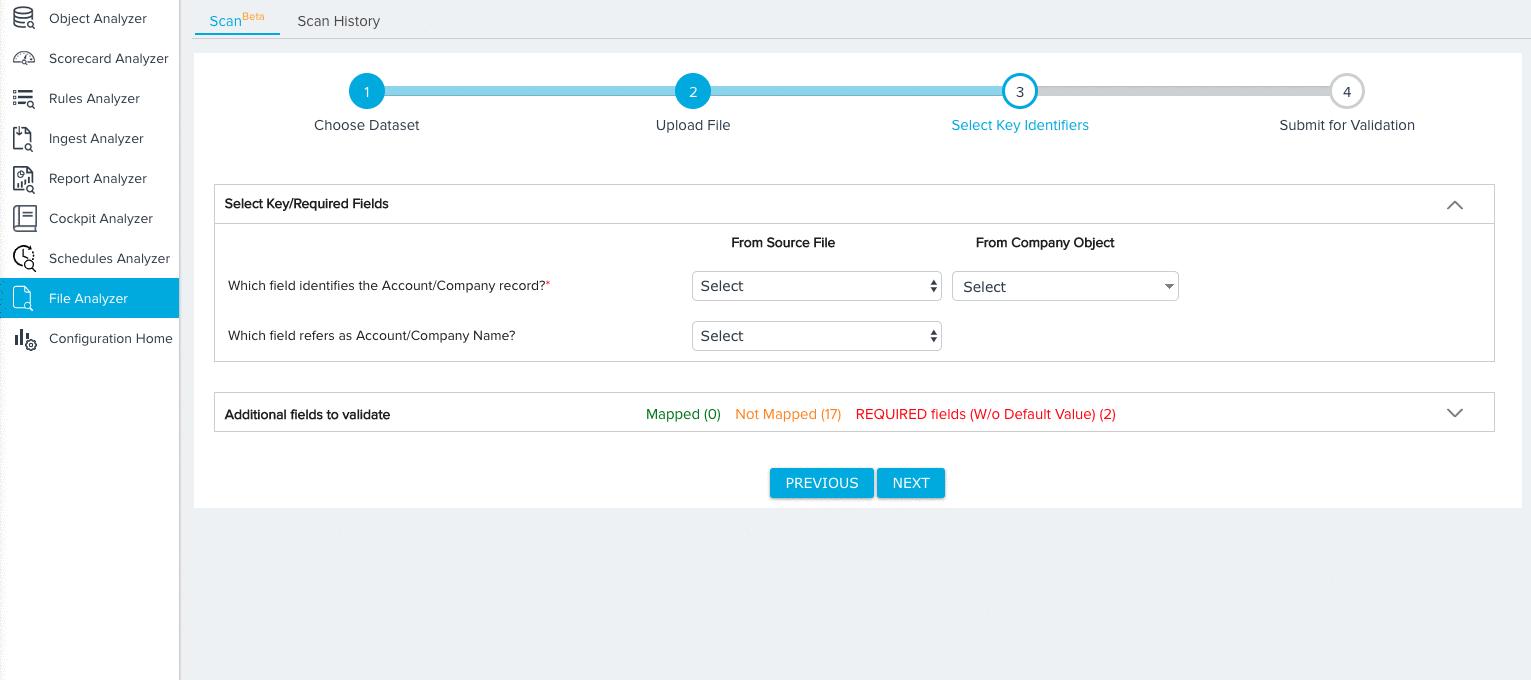
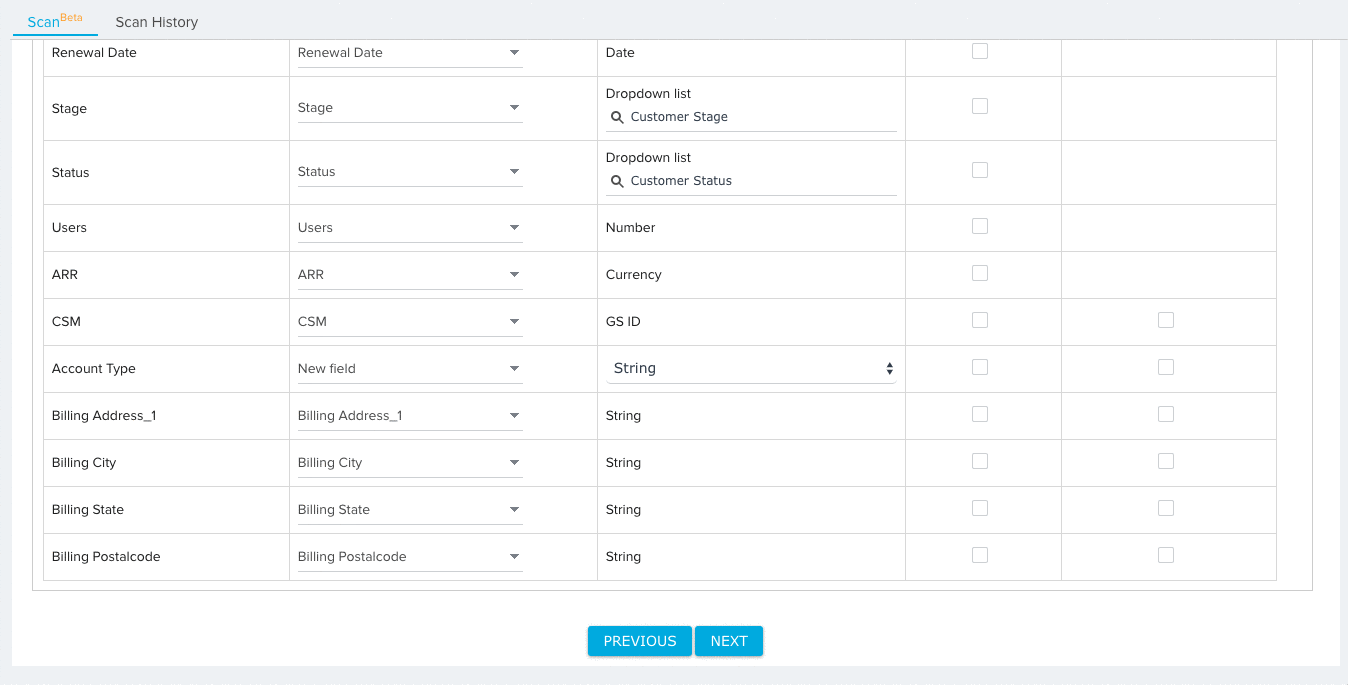
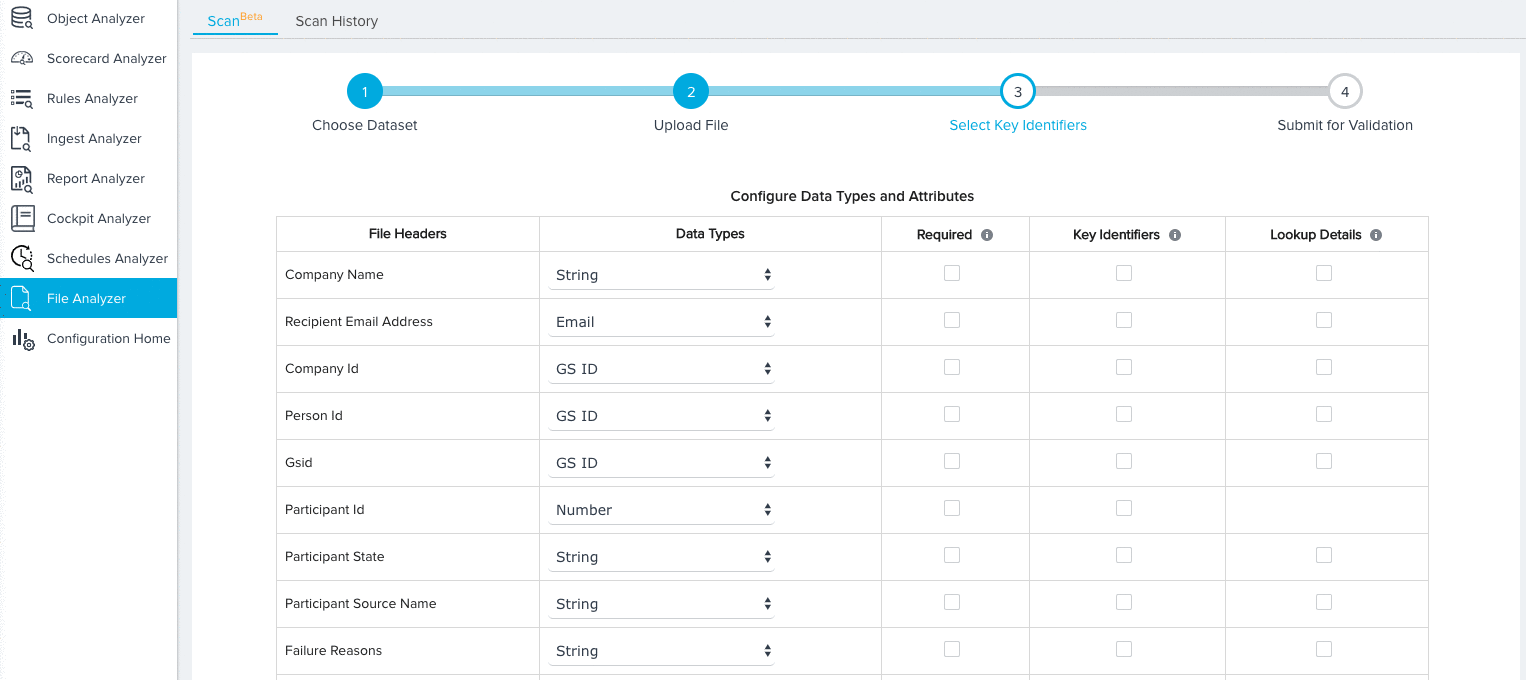
- Expand the additional fields section and map any remaining Source Fields to Target Fields. Past default, the Ignore Field option will be selected for all field mappings. Source fields with the Ignore Field pick volition not be considered for validation.
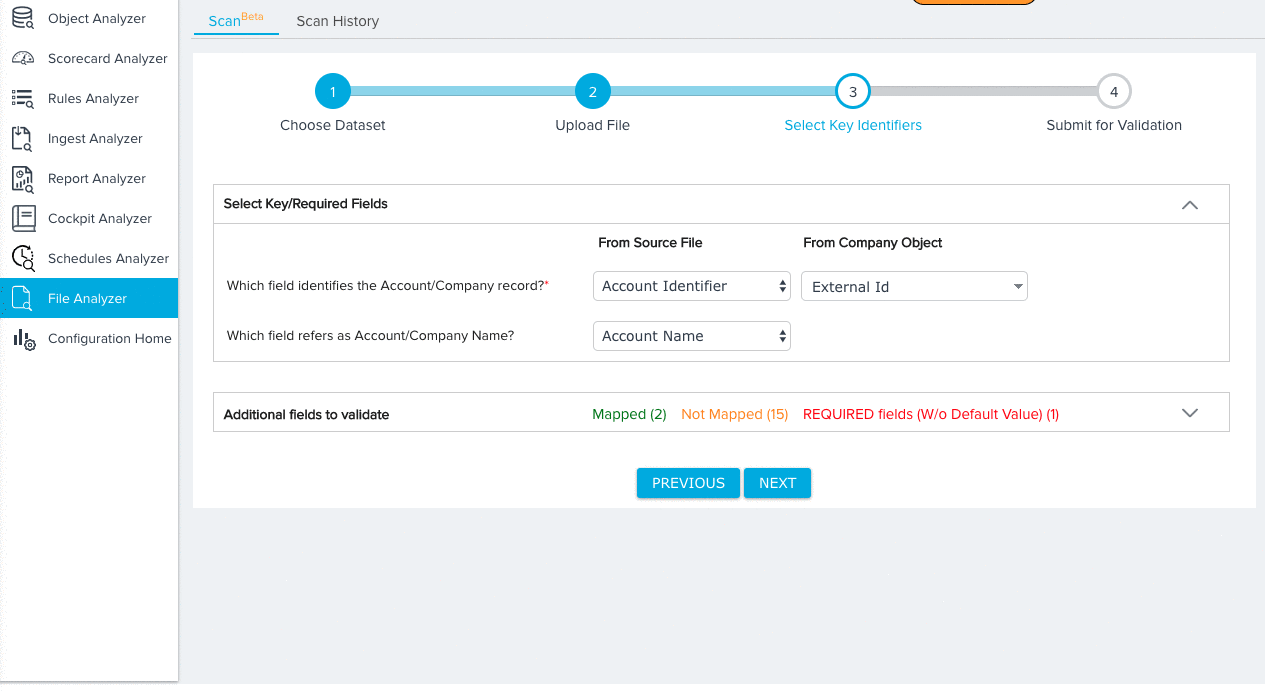
- (Optional) Click AUTO MAP to instantly map each source field to a target field with an identical name.
- Manually map any remaining fields.
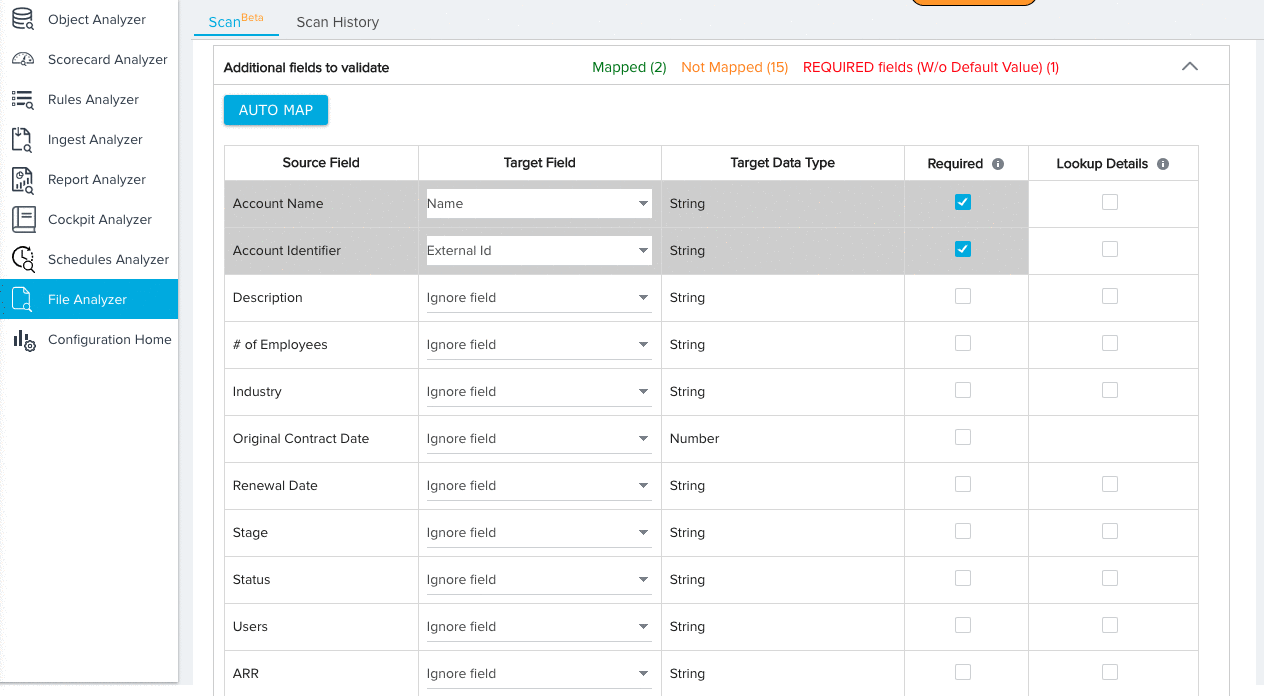
- (Optional) Select the mapping pick New Field for source fields that you would similar to add to the target object. You lot tin configure the data type for the new field after selecting this option.
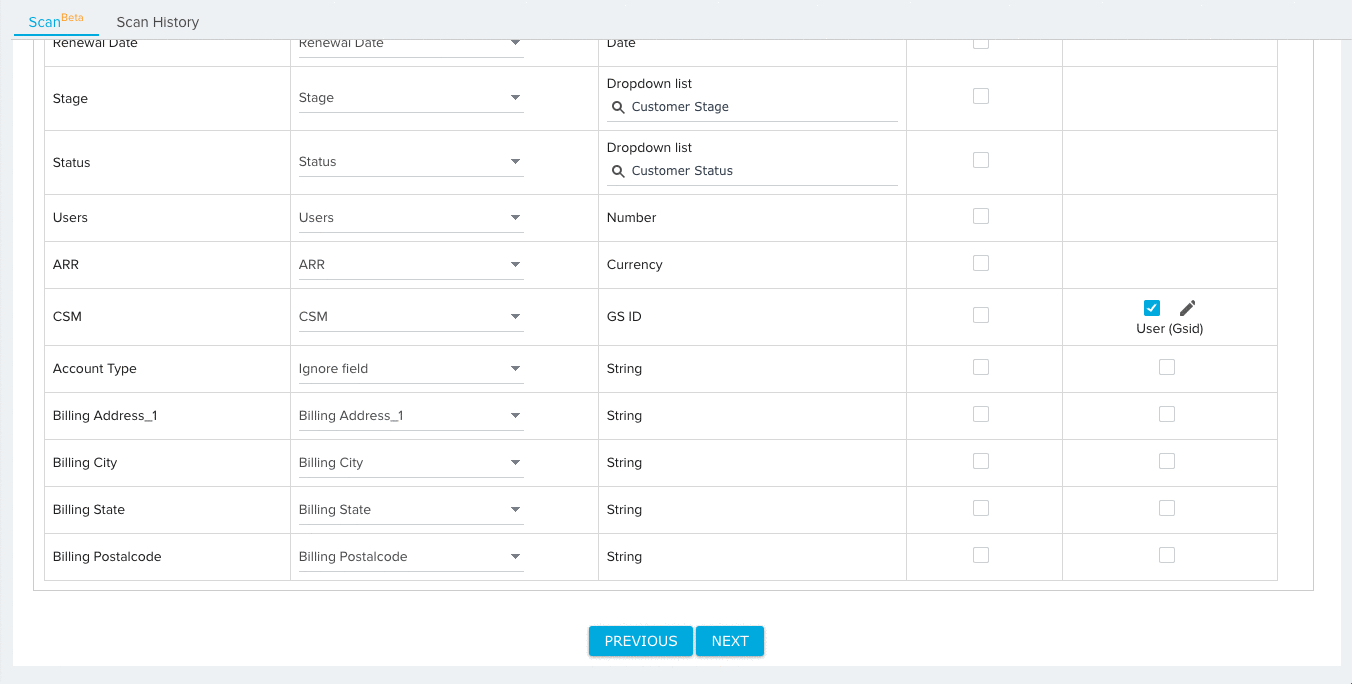
- (Optional) Click the checkbox under the Required column for any field you wish the File Analyzer to consider Required. When the file is scanned, the File Analyzer will check for goose egg values in required fields for each record.
Annotation: The Central Identifier fields for each information set will always exist considered required.
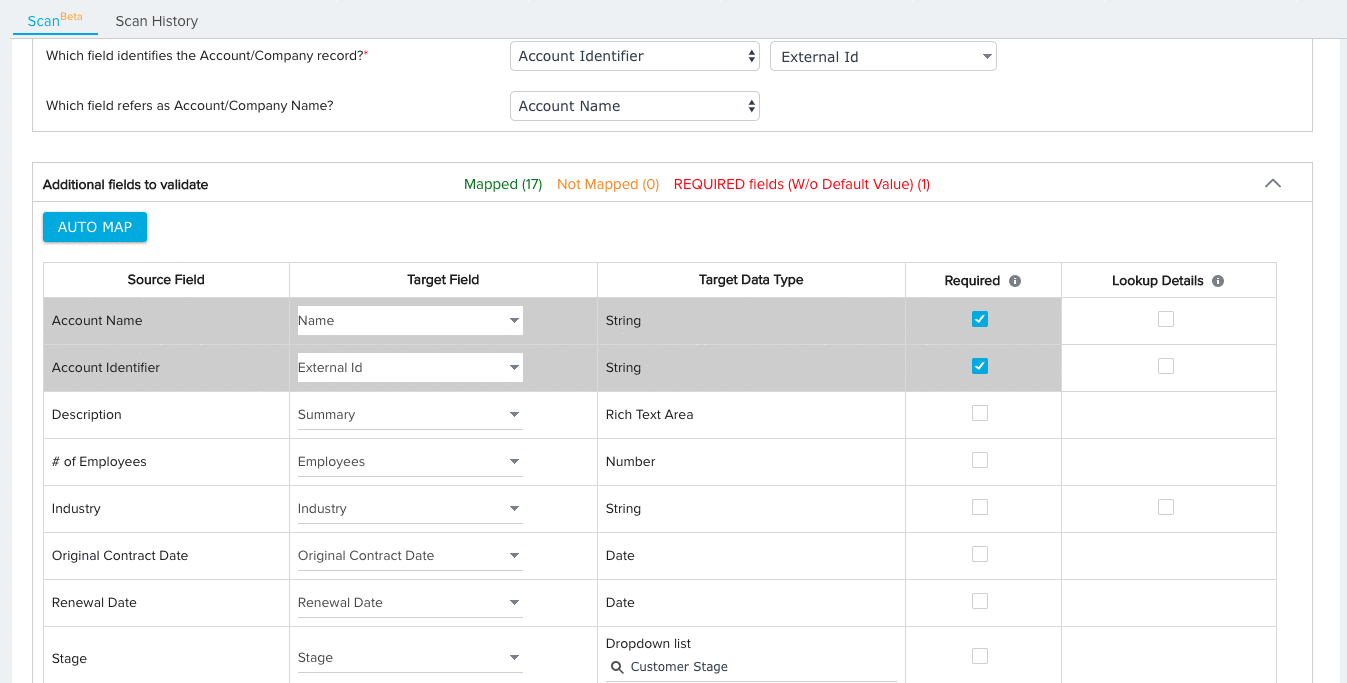
- (Optional) Click the checkbox nether the Lookup Details cavalcade to add together lookup details between the field and a field in some other object. For fields with added lookup details, the File Analyzer validates the data of each field for existence in the looked up object.
- Click Adjacent
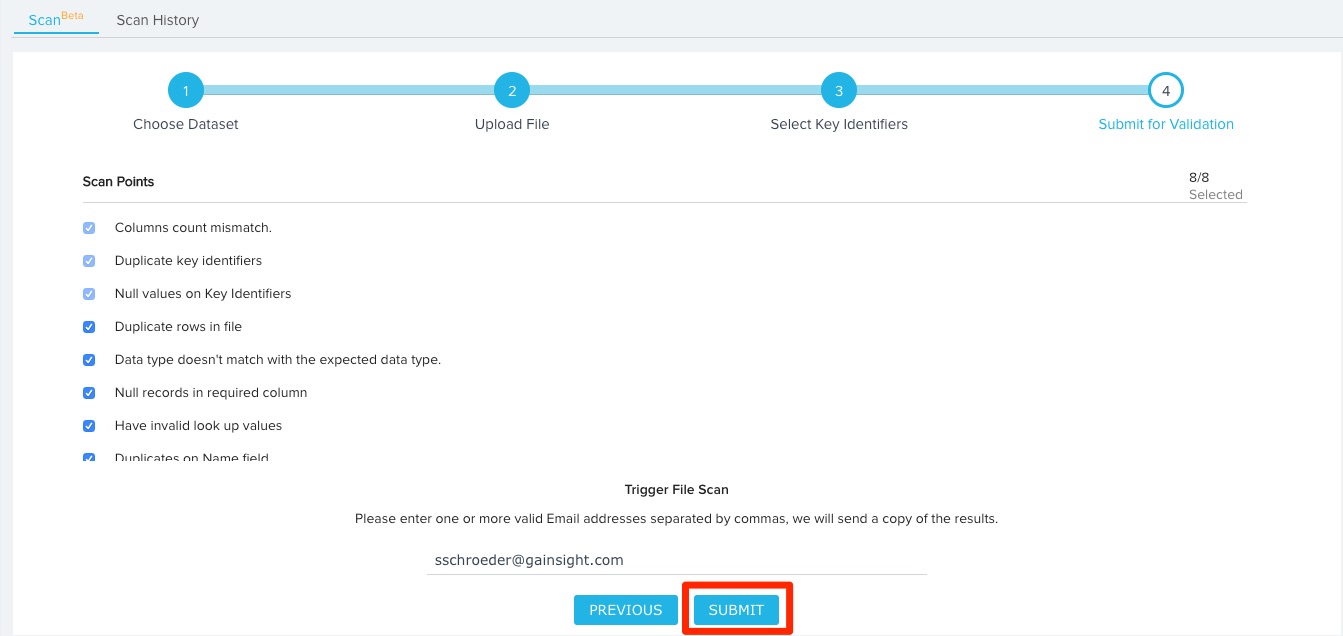
- Review the scan points selected for file analysis. Past default, all scan points will exist checked, and the points Columns count mismatch, Indistinguishable key identifiers, and Goose egg values on Key Identifiers can not be unchecked. For more information on scan points, refer to Browse Points.
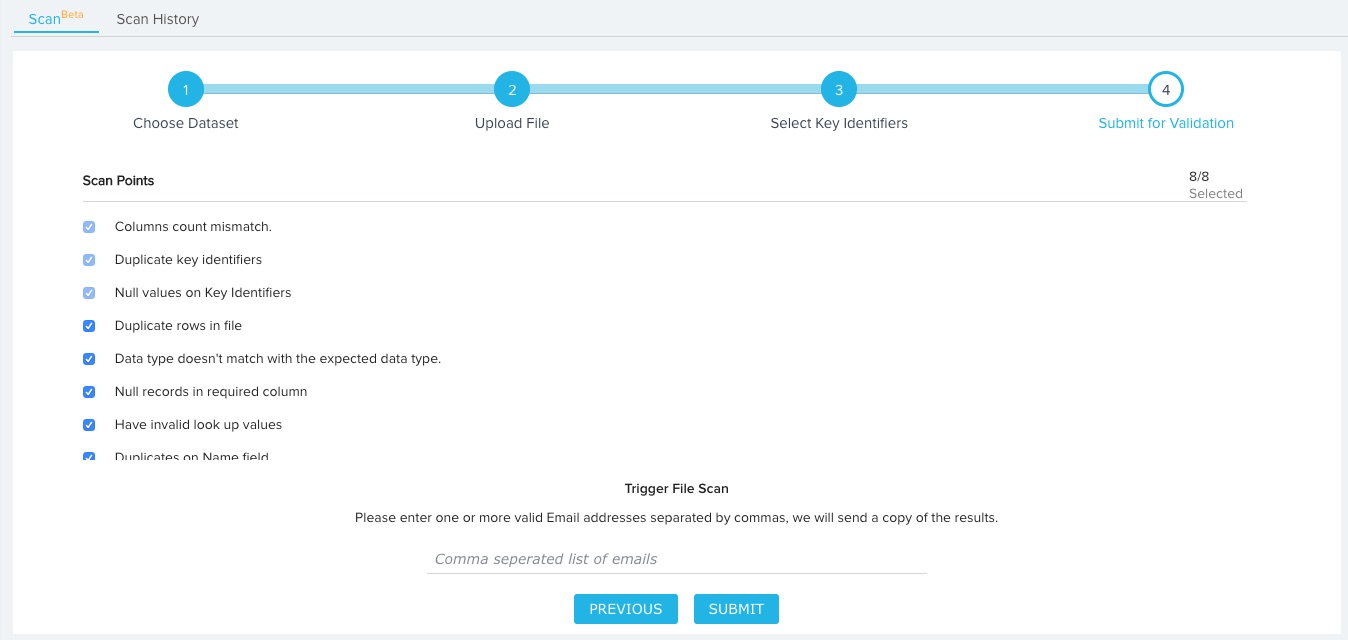
- Enter ane or more valid email addresses, separated by commas, to ship a copy of the analysis results.
- Click SUBMIT to initiate the file validation process.
Dataset Key Identifiers
Each dataset has dissimilar required mappings you must complete in the Select Key Identifiers step. These mappings are defined below:
User
For the User dataset, y'all need to map fields from the source object to the post-obit key identifiers:
- User Proper name (Required)
- User Type (Required)
- Start Name
- Last Name
Visitor
For the Company dataset, you need to map fields from the source object to the following key identifiers:
- Account/Company ID (Required)
- Account/Company Name (Required)
Person
For the Person dataset, you demand to map fields from the source object to the following cardinal identifiers:
- Person Electronic mail (Required)
- Person Name
Relationship
For the Relationship dataset, you need to map fields from the source object to the post-obit cardinal identifiers:
- Relationship ID (Required)
- Account/Visitor ID (Required)
- Relationship Proper name (Required)
 Custom Object
For the Custom Object dataset, you need to map fields from the source object to the following fundamental identifiers:
- Target Object (Required)
- Account/Company ID (Required)
 Generic File
For the Generic File dataset, you have the ability to select any field from the source object as a Primal Identifier by checking the Key Identifier checkbox.
Scan Points
The File Analyzer scans uploaded datasets for the following scan points. Each scan point covers common potential reasons for file upload errors.
Columns count mismatch
This scan bespeak validates if the number of columns for a record matches with the total number of headers.
Duplicate primal identifiers
This scan point validates if there are whatever duplicate records in the key identifiers column combination.
Null values on Key Identifiers
This scan point validates if a tape has null values in fields marked as key identifiers.
Duplicate rows in file
This scan signal validates if there are any duplicate records.
Data type doesn't match with the expected data blazon.
This scan point validates if the column data type matches with the original data type selected by the user.
Zip records in required column
This scan point validates if a column marked as required has null values.
Accept invalid lookup values
This scan point validates if the data in a lookup column exists in the parent object's looked upward field.
Duplicates on Proper name field
This scan point validates if rows have duplicate values on the "Proper noun" field.
Scan History
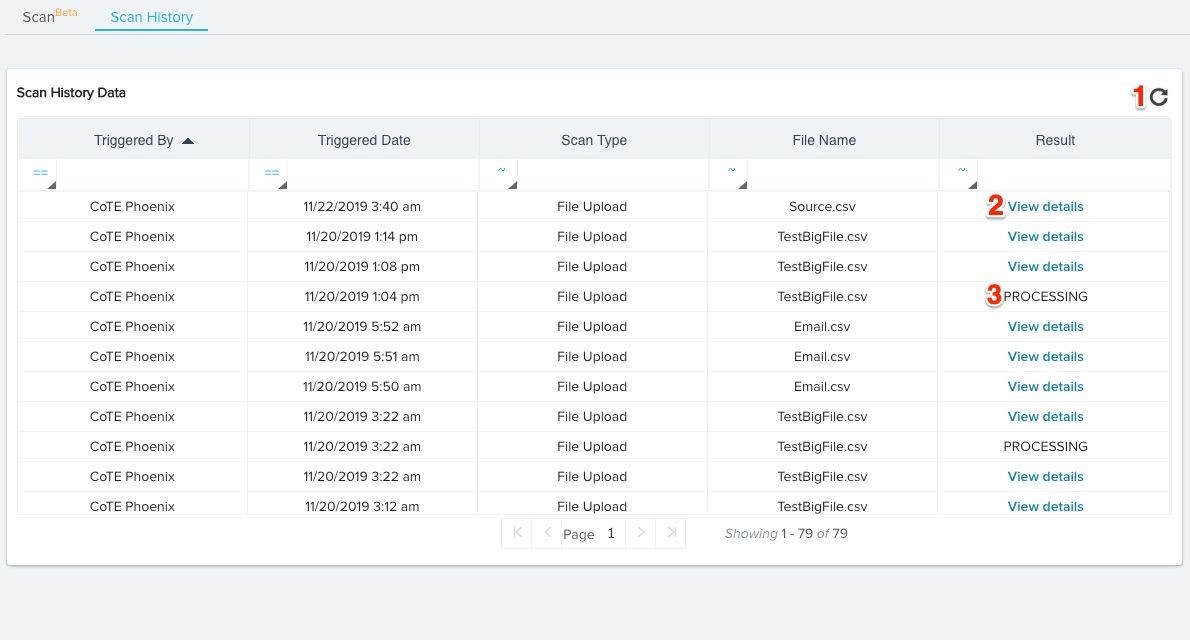
The Browse History Information table contains an entry for every file scan completed within the org and displays the post-obit fields:
- Triggered By: The user who completed the scan.
- Triggered Date: The date/time the scan was completed.
- Scan Type: The file upload method used to complete the browse.
- File Name: The proper noun of the uploaded file.
- Effect: The completion status of the file'due south assay
 You tin can take the following actions in the Scan History tab:
- Refresh: Reload the table with the latest scan history data.
- View Details: Click to view the results of the scanned file analysis. For more information on browse results, refer to Scan Results.
- PROCESSING: The file is nevertheless being scanned and the results are non ready to be viewed.
Browse Results
You can view the results of whatsoever browse completed past the File Analyzer. To view these results, navigate to the Scan History tab and click View details for the results you wish to view. This volition open the scan results folio.
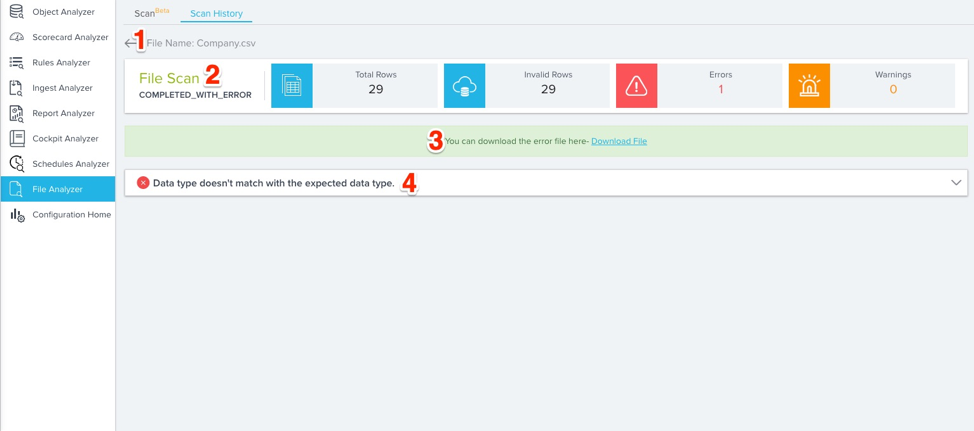
- Navigate Back: Click here to navigate back to the Scan History page.
- File Scan Dashboard: This displays a summary of the scanned file including the number of Total Rows, Invalid Rows, Errors, and Warnings.
- Download Error File: Click here to download the scan's fault file as a CSV.
- Scan Points: Each browse point the File Analyzer identified in its scan will be listed here. You lot can click each scan point to expand information technology and view more than details.
Source: https://support.gainsight.com/Gainsight_NXT/Gainsight_Analyzer/Admin_Guides/File_Analyzer_Admin_Guide
0 Response to "Files Than Can Be Uploaded to Gainsight"
แสดงความคิดเห็น